

Learning how to hang Christmas lights on a house starts with measuring the display area, choosing lights rated for outdoor use, and planning a safe route to power. A simple roofline or porch display can often be installed in a few hours, depending on the home and how much ground you need to cover.
Use the steps below to plan the layout, attach lights without damaging surfaces, and check the finished display. For more seasonal ideas, browse the Christmas Lights category and the wider Christmas & Holiday category.
What You Need
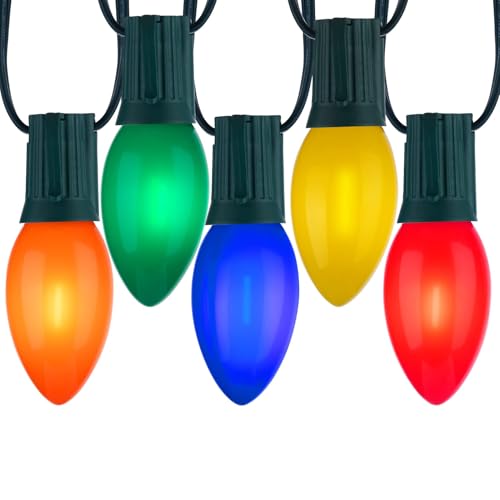
Gather outdoor-rated light strings, compatible clips for your roofline or gutters, a tape measure, a sturdy ladder, and an outdoor-rated extension cord if needed. Check the light maker’s instructions for connection limits and power requirements. Choose lights that suit your layout: C9 bulbs make a defined roofline, while dense fairy lights suit broader decorative areas.
Pros
- 100 multicolor C9 LED bulbs
- Removable, replaceable bulbs
- Includes four spare bulbs and one spare fuse
Cons
- Dimmer not included; skip if you need one in box

Pros
- App and remote control options
- Group control for multiple strings
- Low-voltage design
Cons
- Strings cannot connect end to end
- Skip if you need end-to-end connectable strings

How to Hang Christmas Lights on a House
Step 1: Choose a simple layout
Decide which features to outline, such as the front eaves, porch, windows, or doorway. Start with one area rather than trying to cover the whole house at once. A consistent line of lights usually looks more orderly than a layout with several competing patterns.
Step 2: Measure the route and plan power
Measure each straight section and note corners, gaps, and the distance to the outlet. Add the sections together, then compare the total with the light string’s lit length. Keep the power connection near a suitable outdoor outlet and follow the manufacturer’s instructions for connecting sets.
Do not assume every string can connect end to end. For example, the Dazzle Bright RGB string and the 1,000-LED Dazzle Bright string cannot be connected end to end, according to their listings.
Step 3: Check the lights before climbing
Uncoil the string on the ground and inspect its cord, sockets, and bulbs. Plug it in briefly according to its instructions to check for faults, then unplug it before installation. Do not use a string with damaged insulation, loose parts, or signs of moisture inside electrical connections.
Electrical safety matters outdoors. Keep plugs and connections out of standing water, use only products marked for outdoor use in exposed areas, and follow the manufacturer’s electrical and connection guidance.
Step 4: Pick clips that fit the mounting surface
Use light clips designed for the surface, such as compatible gutter, shingle, or eave clips. Read clip instructions before attaching them, and avoid nails, staples, or screws that can puncture wires or damage roofing and siding. Keep bulbs facing the same direction for a tidy roofline.
Step 5: Set the ladder safely
Place the ladder on firm, level ground, away from doors and walkways. Follow its safety labels, maintain three points of contact while climbing, and avoid leaning sideways to reach beyond the rails. Have another adult steady the ladder when possible.
Do not install lights during rain, snow, or strong wind. Stay clear of overhead power lines, and hire a qualified professional for areas that cannot be reached safely from a properly positioned ladder.
Step 6: Attach lights without pulling the cord
Work along the planned route, fastening each section with clips and leaving enough slack to avoid tension at corners and plugs. Do not pull a string tight or let its weight hang from the electrical connection. Keep cords away from sharp edges and places where doors or windows could pinch them.
Step 7: Connect, secure, and check the display
With the lights unplugged, connect sections only as permitted by their instructions. Secure cords so they do not cross walkways, then plug in the display and inspect it from the ground. Replace or reposition any section that sags, flickers, or blocks a path.
Unplug lights before adjusting them, replacing bulbs, or handling connections. Use a ground-level view to check spacing and alignment rather than reaching from an unstable position.
Common Mistakes to Avoid
Do not estimate the route by eye. A string that is too short can leave an awkward gap, while excess length can tempt you to coil cords tightly or overload a connection. Measure each section and check the listed connection limit first.
Avoid using indoor-only lights outside or treating water resistance as permission to submerge plugs. The two Dazzle Bright strings listed here carry an IP44 rating, while the Brightown listing specifies IP65. These ratings describe product protection, not safe handling of wet electrical connections.
Do not staple or nail through a light cord, and do not use clips that do not suit your roof or gutter. Damaged insulation and pinched wires can create electrical hazards.
Finally, avoid climbing with lights or tools in your hands, reaching too far from a ladder, or working in poor weather. Pause and get help if the installation needs a roof walk or unsafe ladder position.
Recommended Gear
Compare more Christmas light styles if you are still deciding on a display. The three options below suit different layouts, but none replaces safe clips, a measured plan, or careful power management.
Brightown Vintage Christmas Lights Outdoor: Its 100-foot C9 string has 100 multicolor LED bulbs, 12-inch spacing, replaceable bulbs, and an IP65 listing. The listing says up to six additional sets can connect. That makes it a practical option for a defined roofline, though its larger, spaced bulbs may not suit buyers who want a fine, dense glow. Who should skip it: Shoppers seeking app control or closely spaced mini lights. See product details.
Dazzle Bright Dazzle Bright Smart Christmas String Lights: This 98-foot RGB string offers app and remote control, scene options, music synchronization, and IP44 water resistance. It can suit a display where changing colors matters, but its listing says strings cannot connect end to end, so plan power and coverage accordingly. Who should skip it: Buyers who need a simple, fixed-color roofline or direct end-to-end extensions. See product details.
Dazzle Bright Dazzle Bright Outdoor Christmas String Lights: The listing specifies 328 feet of lit string, 1,000 warm-white LEDs, a 17-foot lead cord, eight modes, a remote, and IP44 water resistance. Its long run suits broad decorating plans, but the string cannot be extended or connected to another set. Who should skip it: Anyone who needs a connectable string or a multicolor display. See product details.
Frequently Asked Questions
How many lights do I need for my roofline?
Measure the eaves and other sections you plan to decorate, then compare the total with the product’s lit length. Allow for corners and the route to the outlet, and check spacing to estimate how the bulbs will look across the run.
Can I connect multiple light strings?
Only when the product instructions allow it, and only within the stated limit. Brightown’s listing says its C9 string can connect with up to six additional sets. Both Dazzle Bright listings say their strings cannot connect end to end.
Can I leave outdoor Christmas lights up in the rain?
Check the product’s outdoor-use and water-resistance information, then follow its instructions for plugs and connections. Do not handle electrical connections when wet, and do not submerge light strings or plugs unless the manufacturer explicitly allows it.
What is the safest way to attach lights to gutters?
Use clips made for the gutter or roof edge and follow their directions. Avoid puncturing the light wire or damaging the home with nails or staples. Install from a stable ladder position, and do not reach beyond the ladder rails.
Should I unplug lights before adjusting them?
Yes. Unplug the string before moving it, replacing a bulb, or handling a connection. Follow the manufacturer’s instructions for any maintenance, and keep children away from cords and plugs.



Write Your Review
No reviews yet. Be the first to share your experience!